Getting started with Mocha and unit testing
Mocha
Mocha is a JavaScript test framework running on NodeJS and in the browser. It’s feature rich and has great support for asynchronous testing. It also gives you the possibility to use the assertion library of choice.
A selection of features
- Async support
- Test coverage reporting
- Javascript API for running tests
- file watcher support
- Highlights slow tests
- Transpiler support
Run our first test
Getting started with mocha is easy.
npm install --global mocha
npm install --save-dev mocha
mkdir test
Lets add our first test
test/first_test.js
var assert = require('assert');
describe('Array', function() {
  describe('#indexOf()', function() {
    it('should return -1 when the value is not present', function() {
      assert.equal(-1, [1,2,3].indexOf(4));
    });
  });
});
Now we just run mocha
mocha
You should be getting an output like this.
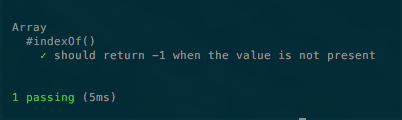
Well that wasn’t too complicated. So what happened.
First we used a built in node module called assert. Basically it just evaluates an expression and throws and exception if the result is false. Most times you would use a more advanced assert library like ChaiJS.
Then we used the describe function which takes a string and a callback. It’s used for grouping tests and as seen above you can nest describe functions.
The It function takes a string and callback which will make one test case. We then assert the result which mocha displays in it’s test reporter.
Specifying tests to run
When we run mocha it looks for test with this glob pattern test/*.js.
If we want to look for tests recursively
mocha --recursive
Or if you want to specify another directory for your tests
mocha -- path/to/tests/*.js
And if you don’t wan’t to re run your tests you can tell mocha to watch your test files for changes.
mocha --watch
To see all parameters just run mocha --help. In my osx terminal i had this strange issue that the help output was cut off so i only got a third of the output. Upgrading node from 6.2.0 to 6.5.0 solved that problem.
Using the “fat arrow”(arrow functions)
You can use arrow functions with Mocha to specify callbacks to describe and It. But because of the lexical binding of this it’s discourage because you wont be able to access Mocha context. With the mocha context you can specify how the tests should behave for example this.skip() and this.slow(1000). The skip function explains itself and the slow function defines a threshold for mocha to mark this test as slow which the test reporter will notify you about.
Testing async code
Lets add a new test.
test/async_test.js
var assert = require('assert');
describe('Async', function () {

  describe('callbacks', function () {
    it('should return 123 after 3 seconds', function (done) {
      this.timeout(4000);
      asyncWithCallback(function (data) {
        assert.equal(data, 123);
        done();
      })
    });
  });

  describe('promises', function () {
    it('should return 567 after 1 second', function () {
      return asyncWithPromise().then((data) => {
        assert.equal(data, 567);
      });
    });
  });

});

function asyncWithCallback(callback) {
  setTimeout(() => {
    callback(123);
  }, 3000);
}

function asyncWithPromise() {
  return new Promise((resolve) => {
    setTimeout(() => {
      resolve(567);
    }, 1000);
  });
}
With mocha we can make use of the done callback to specify when asynchronous tests are done or we can return a promise which mocha will wait for being resolved. Mocha has a default timeout of 2000ms so if a test is taking longer you need to use the mocha context to set a higher timeout.
Conclusion
It’s really simple and fast to get mocha up and running and write simple unit tests. Head over to the Mocha website fore more detailed information.